| Contents | Previous | Next | Programmer's Guide to the JavaTM 2D API |
Graphics2D extends java.awt.Graphics to provide more sophisticated control over the presentation of shapes, text, and images. The Java 2D™ rendering process is controlled through the Graphics2D object and its state attributes.
The Graphics2D state attributes, such as line styles and transformations, are applied to graphic objects when they are rendered. The collection of state attributes associated with a Graphics2D is referred to as the Graphics2D context. To render text, shapes, or images, you set up the Graphics2D context and then call one of the Graphics2D rendering methods, such as draw or fill.
The following tables list the interfaces and classes used in conjunction with the Graphics2D context, including the classes that represent state attributes. Most of these classes are part of the java.awt package.
To render a graphic object using the Java 2D™ API, you set up the Graphics2D context and pass the graphic object to one of the Graphics2D rendering methods.
You can modify the state attributes that form the Graphics2D context to:
Graphics2D defines several methods for adding and changing attributes in the graphics context. Most of these methods take an object that represents a particular attribute, such as a Paint or Stroke object.
The Graphics2D context holds references to these attribute objects: they are not cloned. If you alter an attribute object that is part of the Graphics2D context, you need to call the appropriate set method to notify the context. Modifying an attribute object during a rendering operation will cause unpredictable and possibly unstable behavior.
When a graphic object is rendered, the geometry, image, and attribute information are combined to calculate which pixel values must be changed on the display.
The rendering process for a Shape can be broken down into four steps:
Shape is to be stroked, the Stroke attribute in the Graphics2D context is used to generate a new Shape that encompasses the stroked path. Shape’s path are transformed from user space into device space according to the transform attribute in the Graphics2D context.Shape’s path is clipped using the clip attribute in the Graphics2D context.Shape, if any, is filled using the Paint and Composite attributes in the Graphics2D context.
Rendering text is similar to rendering a Shape, since the text is rendered as individual glyphs and each glyph is a Shape. The only difference is that the Java 2D API must determine what Font to apply to the text and get the appropriate glyphs from the Font before rendering.
Images are handled differently, transformations and clipping operations are performed on the image’s bounding box. The color information is taken from the image itself and its alpha channel is used in conjunction with the current Composite attribute when the image pixels are composited onto the rendering surface.
The Java 2D API lets you indicate whether you want objects to be rendered as quickly as possible, or whether you prefer that the rendering quality be as high as possible. Your preferences are specified as hints through the RenderingHints attribute in the Graphics2D context. Not all platforms support modification of the rendering mode so specifying rendering hints does not guarantee that they will be used.
The RenderingHints class supports the following types of hints:
To set or change the RenderingHints attribute in the Graphics2D context, you call setRenderingHints. When a hint is set to default, the platform rendering default is used is used.
Stroking a Shape such as a GeneralPath object is equivalent to running a logical pen along the segments of the GeneralPath. The Graphics2D Stroke attribute defines the characteristics of the mark drawn by the pen.
A BasicStroke object is used to define the stroke attributes for a Graphics2D context. BasicStroke defines characteristics such as the line width, endcap style, segment join-style, and the dashing pattern. To set or change the Stroke attribute in the Graphics2D context, you call setStroke.


For example, the first image in Figure 2-3 uses the miter join-style; the second image uses a round join-style, a round endcap style, and a dashing pattern.

The Graphics2D rendering methods that use the Stroke attribute are draw, drawArc, drawLine, drawOval, drawPolygon, drawPolyline, drawRect, and drawRoundRect.When one of these methods is called, the outline of the specified Shape is rendered. The Stroke attribute defines the line characteristics and the Paint attribute defines the color or pattern of the mark drawn by the pen.
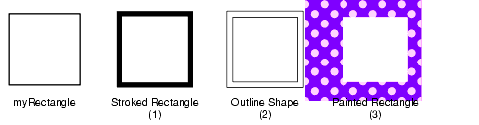
For example, when draw(myRectangle) is called:
Stroke is applied to the rectangle’s outline. Shape object.Paint is applied to the pixels that lie within the contour of the outline Shape. This process is illustrated in Figure 2-4:
The fill attribute in the Graphics2D context is represented by a Paint object. You add a Paint to the Graphics2D context by calling setPaint.
When a Shape or glyph is drawn (Graphics2D.draw, Graphics2D.drawString), the Paint is applied to all of the pixels that lie inside of the Shape that represents the object’s stroked outline. When a Shape is filled (Graphics2D.fill), the Paint is applied to all of the pixels that lie within the Shape’s contour.
Simple solid color fills can be set with the setColor method. Color is the simplest implementation of the Paint interface.
To fill Shapes with more complex paint styles such as gradients and textures, you use the Java 2D Paint classes GradientPaint and TexturePaint. These classes eliminate the time-consuming task of creating complex fills using simple solid-color paints. Figure 2-5 illustrates two fills that could easily be defined by GradientPaint and TexturePaint.

When fill is called to render a Shape, the system:
Shape.Paint object.|
Batch Processing
|
|---|
| To streamline the processing of pixels, the Java 2D API processes them in batches. A batch can be either a contiguous set of pixels on a given scanline or a block of pixels. This batch processing is done in two steps:
The |
A clipping path identifies the portion of a Shape or Image that needs to be rendered. When a clipping path is part of the Graphics2D context, only those parts of a Shape or Image that lie within the path are rendered.
To add a clipping path to the Graphics2D context, you call setClip. Any Shape can be used to define the clipping path.
To change the clipping path, you can either use setClip to specify a new path or call clip to change the clipping path to the intersection of the old clipping path and a new Shape.
The Graphics2D context contains a transform that is used to transform objects from user space to device space during rendering. To perform additional transformations, such as rotation or scaling, you can add other transforms to the Graphics2D context. These additional transforms become part of the pipeline of transformations applied during rendering.
Graphics2D provides several different ways to modify the transform in the Graphics2D context. The simplest is to call one of the Graphics2D transformation methods: rotate, scale, shear, or translate. You specify the characteristics of the transform that you want to be applied during rendering, and Graphics2D automatically makes the appropriate changes.
You can also explicitly concatenate an AffineTransform with the current Graphics2D transform. An AffineTransform performs a linear transformation such as translation, scaling, rotation, or shearing on a set of graphics primitives. When a transform is concatenated with an existing transform, the last transform specified is the first to be applied. To concatenate a transform with the current transform, you pass an AffineTransform to Graphics2D.transform.
The Graphics2D class also contains a setTransform method, but this method should never be used to concatenate another coordinate transform onto of an existing transform. The setTransform method overwrites the Graphics2D object’s current transform, which is needed for other purposes, such as:
JComponent at non-zero translation from its parent’s originGraphics2D object might want to transform the rendering for effect .
The setTransform method is intended for setting the Graphics2D object back to the original transform after rendering the transformed graphics, text or images:
Graphics2D also provides a version of drawImage that takes an AffineTransform as a parameter. This enables you to apply a transformation to an image object when it is drawn without permanently modifying the transformation pipeline. The image is drawn as if you had concatenated the transform with the current transform in the Graphics2D context.
|
Affine Transforms
|
|---|
|
The Java 2D API provides one transform class, An affine transformation performs a linear transformation on a set of graphics primitives. It always transforms straight lines into straight lines and parallel lines into parallel lines; however, the distance between points and the angles between nonparallel lines might be altered. Affine transformations are based on two-dimensional matrices of the following form:
Transforms can be combined, effectively creating a series or pipeline of transformations that can be applied to an object. This combination is referred to as concatenation. When a transform is concatenated with an existing transform, such as with
Pre-concatenation is used to perform transformations relative to device space instead of user space. For example, you could use |
AffineTransform provides a set of convenience methods for constructing AffineTransform objects:
getTranslateInstancegetRotateInstancegetScaleInstancegetShearInstance
To use these methods, you specify the characteristics of the transform you want to create and AffineTransform generates the appropriate transform matrix. You can also construct an AffineTransform by directly specifying the elements of the transformation matrix.
When two graphic objects overlap, it is necessary to determine what colors to render the overlapping pixels. For example, if a red rectangle and a blue rectangle overlap, the pixels that they share could be rendered red, blue, or some combination of the two. The color of the pixels in the overlapping area will determine which rectangle appears to be on top and how transparent it looks. The process of determining what color to render pixels shared by overlapping objects is called compositing.
Two interfaces form the basis of the Java 2D compositing model: Composite and CompositeContext.
To specify the compositing style that should be used, you add an AlphaComposite object to the Graphics2D context by calling setComposite. AlphaComposite, an implementation of the Composite interface, supports a number of different compositing styles. Instances of this class embody a compositing rule that describes how to blend a new color with an existing one.
One of the most commonly used compositing rules in the AlphaComposite class is SRC_OVER, which indicates that the new color (the source color) should be blended over the existing color (the destination color).
A color’s alpha value is a measure of its transparency: it indicates, as a percentage, how much of a previously rendered color should show through when colors overlap. Opaque colors (alpha=1.0) don’t allow any of the underlying color to show through, while transparent colors (alpha=0.0) let all of it show through.
When text and Shapes are rendered, the alpha value is derived from the Paint attribute in the Graphics2D context. When Shapes and text are antialiased, the alpha value from the Paint in the Graphics2D context is combined with pixel coverage information from the rasterized path. Images maintain their own alpha information—see “Transparency and Images” on page 26 for more information.
When you construct an AlphaComposite object, you can specify an additional alpha value. When you add this AlphaComposite object to the Graphics2D context, this extra alpha value increases the transparency of any graphic objects that are rendered—the alpha value of each graphic object is multiplied by the AlphaComposite’s alpha value.
Images can carry transparency information for each pixel in the image. This information, called an alpha channel, is used in conjunction with the Composite object in the Graphics2D context to blend the image with existing drawings.
For example, Figure 2-6 contains three images with different transparency information. In each case, the image is displayed over a blue rectangle. This example assumes that the Graphics2D context contains an AlphaComposite object that uses SRC_OVER as the compositing operation.
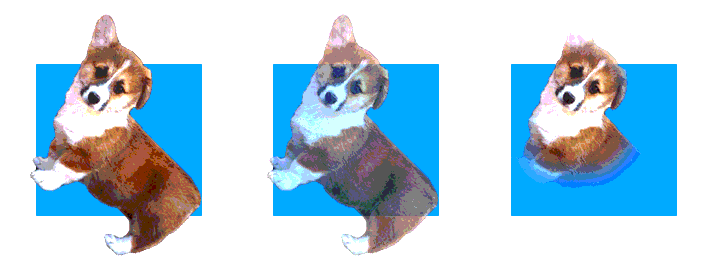
In the first image, all of the pixels are either fully opaque (the dog’s body) or fully transparent (the background). This effect is often used on Web pages. In the second image, all of the pixels in the dog’s body are rendered using a uniform, non-opaque alpha value, allowing the blue background to show through. In the third image, the pixels around the dogs face are fully opaque (alpha=1.0), but as the distance from its face increases, the alpha values for the pixels decrease.
To configure the Graphics2D context for rendering, you use the Graphics2D set methods to specify attributes such as the RenderingHints, Stroke, Paint, clipping path, Composite, and Transform.
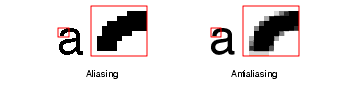
A RenderingHints object encapsulates all of your preferences concerning how an object is rendered. To set the rendering hints in the Graphics2D context, you create a RenderingHints object and pass it into Graphics2D.setRenderingHints.
Setting a rendering hint does not guarantee that a particular rendering algorithm will be used: not all platforms support modification of the rendering mode.
In the following example, antialiasing is enabled and the rendering preference is set to quality:
qualityHints = new               RenderingHints(RenderingHints.KEY_ANTIALIASING,               RenderingHints.VALUE_ANTIALIAS_ON);
qualityHints.put(RenderingHints.KEY_RENDERING,               RenderingHints.VALUE_RENDER_QUALITY);
g2.setRenderingHints(qualityHints);
A BasicStroke defines the characteristics applied to a Shape’s outline, including its width and dashing pattern, how line segments are joined together, and the decoration (if any) applied to the end of a line. To set the stroke attributes in the Graphics2D context, you create a BasicStroke object and pass it into setStroke.
To set the stroke width, you create a BasicStroke object with the desired width and call setStroke.
In the following example, the stroke width is set to twelve points and the defaults are used for the join and endcap decorations:
To set the join and endcap styles, you create a BasicStroke object with the desired attributes.
In the following example, the stroke width is set to twelve points and the round join and endcap styles are used instead of the defaults:
roundStroke = new BasicStroke(4.0f, BasicStroke.CAP_ROUND,              BasicStroke.JOIN_ROUND);
g2.setStroke(roundStroke);
Complex dashing patterns can easily be defined with a BasicStroke object. When you create a BasicStroke object, you can specify two parameters that control the dashing pattern:
dash—an array that represents the dashing pattern. Alternating elements in the array represent the dash size and the size of the space between dashes. Element 0 represents the first dash, element 1 represents the first space.dash_phase—an offset that defines where the dashing pattern starts.In the following example, two different dashing patterns are applied to a line. In the first, the size of the dashes and the space between them is constant. The second dashing pattern is more complex, using a six-element array to define the dashing pattern.
float dash1[] = {10.0f};
BasicStroke bs = new BasicStroke(5.0f, BasicStroke.CAP_BUTT,
                 BasicStroke.JOIN_MITER, 10.0f, dash1, 0.0f);
g2.setStroke(bs);
Line2D line = new Line2D.Float(20.0f, 10.0f, 100.0f, 10.0f);
g2.draw(line);

float[] dash2 = {6.0f, 4.0f, 2.0f, 4.0f, 2.0f, 4.0f};
bs = new BasicStroke(5.0f, BasicStroke.CAP_BUTT,
     BasicStroke.JOIN_MITER, 10.0f, dash2, 0.0f);
g2.setStroke(bs);
g2.draw(line);
Both dashing patterns use a dash phase of zero, causing the dashes to be drawn starting at the beginning of the dashing pattern. The two dashing patterns are shown in Figure Figure 2-7
.
The Paint attribute in the Graphics2D context determines the fill color or pattern that is used when text and Shapes are rendered.
The GradientPaint class provides an easy way to fill a shape with a gradient of one color to another. When you create a GradientPaint, you specify a beginning position and color, and an ending position and color. The fill color changes proportionally from one color to the other along the line connecting the two positions, as shown in Figure 2-8.
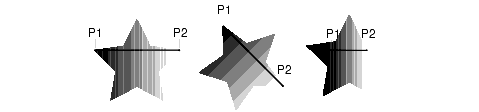
In the third star in Figure 2-8, both points lie within the shape. All of the points along the gradient line extending beyond P1 take the beginning color, and the points along the gradient line extending beyond P2 take the ending color.
To fill a shape with a gradient of one color to another:
GradientPaint object.Graphics2D.setPaint.Shape.Graphics2D.fill(shape).In the following example, a rectangle is filled with a blue-green gradient.
GradientPaint gp = new GradientPaint(50.0f, 50.0f, Color.blue
                   50.0f, 250.0f, Color.green);
g2.setPaint(gp);
g2.fillRect(50, 50, 200, 200);
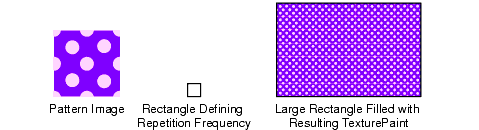
The TexturePaint class provides an easy way to fill a shape with a repeating pattern. When you create a TexturePaint, you specify a BufferedImage to use as the pattern. You also pass the constructor a rectangle to define the repetition frequency of the pattern, as shown in Figure 2-9.
To fill a shape with a texture:
TexturePaint object.Graphics2D.setPaint.Shape.Graphics2D.fill(shape).In the following example, a rectangle is filled with a simple texture created from a buffered image.
// Create a buffered image texture patch of size 5x5
BufferedImage bi = new BufferedImage(5, 5,
                       BufferedImage.TYPE_INT_RGB);
Graphics2D big = bi.createGraphics();
// Render into the BufferedImage graphics to create the texture
big.setColor(Color.green);
big.fillRect(0,0,5,5);
big.setColor(Color.lightGray);
big.fillOval(0,0,5,5);

// Create a texture paint from the buffered image
Rectangle r = new Rectangle(0,0,5,5);
TexturePaint tp = new TexturePaint(bi,r,TexturePaint.NEAREST_NEIGHBOR);

// Add the texture paint to the graphics context.
g2.setPaint(tp);

// Create and render a rectangle filled with the texture.
g2.fillRect(0,0,200,200);
}
To define a clipping path:
Shape that represents the area you want to render.Graphics2D.setClip to use the shape as the clipping path for the Graphics2D context.To shrink the clipping path:
Shape that intersects the current clipping path.clip to change the clipping path to the intersection of the current clipping path and the new Shape.
In the following example, a clipping path is created from an ellipse and then modified by calling clip.
public void paint(Graphics g) {
  Graphics2D g2 = (Graphics2D) g;

// The width and height of the canvas
  int w = getSize().width;
  int h = getSize().height;
  // Create an ellipse and use it as the clipping path
  Ellipse2D e = new Ellipse2D.Float(w/4.0f,h/4.0f,
                                    w/2.0f,h/2.0f);
  g2.setClip(e);

  // Fill the canvas. Only the area within the clip is rendered
  g2.setColor(Color.cyan);
  g2.fillRect(0,0,w,h);

  // Change the clipping path, setting it to the intersection of
  // the current clip and a new rectangle.
  Rectangle r = new Rectangle(w/4+10,h/4+10,w/2-20,h/2-20);
  g2.clip(r);

  // Fill the canvas. Only the area within the new clip
  // is rendered
  g2.setColor(Color.magenta);
  g2.fillRect(0,0,w,h);
}
To transform a Shape, text string, or Image you add a new AffineTransform to the transformation pipeline in the Graphics2D context before rendering. The transformation is applied when the graphic object is rendered.
For example, to draw a rectangle that is rotated 45 degrees:
Graphics2D transform before performing any transformations. Always call getTransform on the Graphics2D before adding a transform to the graphics context because the graphics context might already have a transform that is needed for other reasons, such as positioning Swing and lightweight components within a window. AffineTransform. getRotateInstance. Graphics2D.transform to add the new transform to the transformation pipeline. Never use the setTransform method to add a new coordinate transform because setTransform will overwrite the current transform in the graphics context.Rectangle2D.Float object. Graphics2D.draw to render the rectangle. Graphics2D back to the original transform that you saved in Step 1 by calling setTransform with the original transform.
In the following example, an instance of AffineTransform is used to rotate a rectangle 45 degrees when it is rendered.
AffineTransform aT = g2.getTransform();Rectangle2D rect = new Rectangle2D.Float(1.0,1.0,2.0,3.0);
AffineTransform rotate45 =
  AffineTransform.getRotateInstance(Math.PI/4.0,0.0,0.0)
g2.transform(rotate45);
g2.draw(rect);g2.setTransform(aT);
In this example, an AffineTransform is used to rotate a text string around a center point:
// Define the rendering transform
AffineTransform at = new AffineTransform();
// Apply a translation transform to make room for the
// rotated text.
at.setToTranslation(400.0, 400.0);
g2.transform(at);
// Create a rotation transform to rotate the text
at.setToRotation(Math.PI / 2.0);
// Render four copies of the string “Java” at 90 degree angles
for (int i = 0; i < 4; i++) {
    g2.drawString(“Java”, 0.0f, 0.0f);
    g2.transform(at);
}
You can transform an image in the same way—the transform in the Graphics2D context is applied during rendering regardless of the type of graphic object being rendered.
To apply a transform to an image without changing the transform in the Graphics2D context, you can pass an AffineTransform to drawImage:
AffineTransform rotate45 =
  AffineTransform.getRotateInstance(Math.PI/4.0,0.0,0.0)
g2.drawImage(myImage, rotate45);
Transforms can also be applied to a Font to create a modified version of the Font, for more information see “Creating Font Derivations” on page 65.
An AlphaComposite encapsulates composition rules that determine how colors should be rendered when one object overlaps another. To specify the composition style for the Graphics2D context, you create an AlphaComposite and pass it into setComposite. The most commonly used is composition style is SRC_OVER.
The SRC_OVER compositing rule composites the source pixel over the destination pixel such that the shared pixel takes the color of the source pixel. For example, if you render a blue rectangle and then render a red rectangle that partially overlaps it, the overlapping area will be red. In other words, the object that is rendered last will appear to be on top.
To use the SRC_OVER composition rule:
AlphaComposite object by calling getInstance and specifying the SRC_OVER rule.setComposite to add the AlphaComposite object to the Graphics2D context.Once the composite object is set, overlapping objects will be rendered using the specified composition rule.
AlphaComposite allows you to specify an additional constant alpha value that is multiplied with the alpha of the source pixels to increase transparency.
For example, to create an AlphaComposite object that renders the source object 50% transparent, specify an alpha of .5:
In the following example, a source over alpha composite object is created with an alpha of .5 and added to the graphics context, causing subsequent shapes to be rendered 50% transparent.
public void paint(Graphics g) {
  Graphics2D g2 = (Graphics2D) g;

  g2.setColor(Color.red);
  g2.translate(100,50);
  // radians=degree * pie / 180
  g2.rotate((45*java.lang.Math.PI)/180);
  g2.fillRect(0,0,100,100);
  g2.setTransform(new AffineTransform());  // set to identity
  // Create a new alpha composite
  AlphaComposite ac =
      AlphaComposite.getInstance(AlphaComposite.SRC_OVER,0.5f);
  g2.setComposite(ac);
  g2.setColor(Color.green);
  g2.fillRect(50,0,100,100);
  g2.setColor(Color.blue);
  g2.fillRect(125,75,100,100);
  g2.setColor(Color.yellow);
  g2.fillRect(50,125,100,100);
  g2.setColor(Color.pink);
  g2.fillRect(-25,75,100,100);
}
Graphics2D provides rendering methods for Shapes, Text, and Images:
draw—strokes a Shape’s path using the Stroke and Paint objects in the Graphics2D context.fill—fills a Shape using the Paint in the Graphics2D context.drawString—renders the specified text string using the Paint in the Graphics2D context.drawImage—renders the specified image.
To stroke and fill a shape, you must call both the draw and fill methods.
Graphics2D also supports the draw and fill methods from previous versions of the JDK software, such as drawOval and fillRect.
The outline of any Shape can be rendered with the Graphics2D.draw method. The draw methods from previous versions of the JDK software are also supported: drawLine, drawRect, drawRoundRect, drawOval, drawArc, drawPolyline, drawPolygon, draw3DRect.
When a Shape is drawn, its path is stroked with the Stroke object in the Graphics2D context. (See “Stroke Attributes” on page 19 for more information.) By setting an appropriate BasicStroke object in the Graphics2D context, you can draw lines of any width or pattern. The BasicStroke object also defines the line’s endcap and join attributes.
To render shape’s outline:
BasicStroke objectGraphics2D.setStrokeShape.Graphics2D.draw(shape).
In the following example, a GeneralPath object is used to define a star and a BasicStroke object is added to the Graphics2D context to define the star’s line with and join attributes.
public void paint(Graphics g) {
  Graphics2D g2 = (Graphics2D) g;

  // create and set the stroke
  g2.setStroke(new BasicStroke(4.0f));

  // Create a star using a general path object
  GeneralPath p = new GeneralPath(GeneralPath.NON_ZERO);
  p.moveTo(- 100.0f, - 25.0f);
  p.lineTo(+ 100.0f, - 25.0f);
  p.lineTo(- 50.0f, + 100.0f);
  p.lineTo(+ 0.0f, - 100.0f);
  p.lineTo(+ 50.0f, + 100.0f);
  p.closePath();

  // translate origin towards center of canvas
  g2.translate(100.0f, 100.0f);

  // render the star's path
  g2.draw(p);
}
The Graphics2D.fill method can be used to fill any Shape. When a Shape is filled, the area within its path is rendered with the Graphics2D context’s current Paint attribute—a Color, TexturePaint, or GradientPaint.
The fill methods from previous versions of the JDK software are also supported: fillRect, fill3DRect, fillRoundRect, fillOval, fillArc, fillPolygon, clearRect.
To fill a Shape:
Graphics2D.setColor or Graphics2D.setPaint.Shape.Graphics2D.fill to render the Shape.
In the following example, setColor is called to define a green fill for a Rectangle2D.
public void paint(Graphics g) {
  Graphics2D g2 = (Graphics2D) g;

  g2.setPaint(Color.green);
  Rectangle2D r2 = new Rectangle2D.Float(25,25,150,150);

   g2.fill(r2);
}
To render a text string, you call Graphics2D.drawString, passing in the string that you want to render. For more information about rendering text and selecting fonts, see “Fonts and Text Layout” on page 45.
To render an Image, you create the Image and call Graphics2D.drawImage. For more information about processing and rendering images, see “Imaging” on page 67.
You can create an entirely new type of compositing operation by implementing the Composite and CompositeContext interfaces. A Composite object provides a CompositeContext object that actually holds the state and performs the compositing work. Multiple CompositeContext objects can be created from one Composite object to maintain the separate states in a multithreaded environment.
With the release of the JavaTM 2 SDK, version 1.3 and later versions, the Java 2DTM API supports three different multi-screen configurations that can possibly be configured by a native platform:
The Java 2D API enables you to create Frame, JFrame, Window, or JWindow objects with a GraphicsConfiguration to target a screen device for rendering.
In all three configurations, each screen device is represented by a GraphicsDevice. A GraphicsDevice can have multiple GraphicsConfiguration objects associated with it.
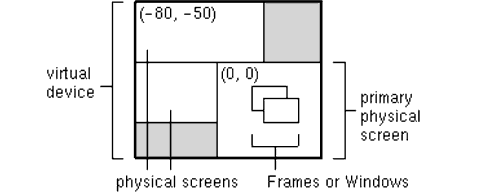
When two or more screens are used to form a virtual device, a virtual coordinate system that exists outside of the physical screens is used to represent the virtual device. The bounds of each GraphicsConfiguration in this multi-screen configuration are relative to the virtual coordinate system. One screen in this environment is identified as the primary screen, which is located at (0, 0) in the virtual coordinate system. Depending on the location of the primary screen, the virtual device might have negative coordinates, as shown in Figure 2-10:
To determine if your environment is a virtual device environment in which a Window or a Frame can span two or more physical screens, call getBounds on each GraphicsConfiguration in your system and check to see if the origin is something other than (0, 0). The getBounds method of a GraphicsConfiguration returns a Rectangle in the virtual coordinate system. So, if any of the origins are not (0, 0), your environment is a virtual device environment.
In a virtual device environment, the coordinates of the GraphicsConfiguration objects are relative to the virtual coordinate system. So, you must use virtual coordinates when calling the setLocation method of a Frame or Window. For example, this code sample gets the bounds of a GraphicsConfiguration and uses the bounds to set the location of a Frame at (10, 10) relative to the origin of the physical screen of the corresponding GraphicsConfiguration.
Frame f = new Frame(GraphicsConfiguration gc);
Rectangle bounds = gc.getBounds();
f.setLocation(10 + bounds.x, 10 + bounds.y);
If the bounds of the GraphicsConfiguration are not taken into account, the Frame is displayed at (10, 10) on the primary physical screen, which might be different from the physical screen of the specified GraphicsConfiguration.
The getBounds method can also be used to determine the bounds of the virtual device. Call getBounds on each GraphicsConfiguration in your system. To determine the bounds of the virtual device, calculate the union of all the bounds. This technique is used in the following sample.
Rectangle virtualBounds = new Rectangle();
GraphicsEnvironment ge =
   GraphicsEnvironment.getLocalGraphicsEnvironment();
GraphicsDevice[] gs = ge.getScreenDevices();
for (int j = 0; j < gs.length; j++) {
   GraphicsDevice gd = gs[j];
   GraphicsConfiguration[] gc = gd.getConfigurations();
   for (int i = 0; i < gc.length; i++) {
      virtualBounds = virtualBounds.union(gc[i].getBounds());
   }
}
The following applet creates a JFrame with every GraphicsConfiguration of every GraphicsDevice in the GraphicsEnvironment. Each JFrame displays a set of red, green and blue stripes, the screen number, the GraphicsConfiguration number and the bounds of the GraphicsConfiguration. This code sample must be run with the JavaTM 2 SDK, version 1.3 or later.
import java.applet.Applet;
import java.awt.*;
import javax.swing.*;

public class MultiFrameApplet extends Applet {

    public MultiFrameApplet() {
        main(null);
    }

    public static void main(String[] argv) {
        GraphicsEnvironment ge =
           GraphicsEnvironment.getLocalGraphicsEnvironment();
        GraphicsDevice[] gs = ge.getScreenDevices();
        for (int j = 0; j < gs.length; j++) {
          GraphicsDevice gd = gs[j];
          GraphicsConfiguration[] gc =
             gd.getConfigurations();
             for (int i=0; i < gc.length; i++) {
               JFrame f =
                  new JFrame(gs[j].getDefaultConfiguration());
               GCCanvas c = new GCCanvas(gc[i]);
               Rectangle gcBounds = gc[i].getBounds();
               int xoffs = gcBounds.x;
               int yoffs = gcBounds.y;
               f.getContentPane().add(c);
               f.setTitle("Screen# "+Integer.toString(j)+",
                  GC# "+Integer.toString(i));
               f.setSize(300, 150);
               f.setLocation((i*50)+xoffs, (i*60)+yoffs);
               f.show();
             }
        }
    }
}

class GCCanvas extends Canvas {

    GraphicsConfiguration gc;
    Rectangle bounds;

    public GCCanvas(GraphicsConfiguration gc) {
        super(gc);
        this.gc = gc;
        bounds = gc.getBounds();
    }

    public Dimension getPreferredSize() {
        return new Dimension(300, 150);
    }

    public void paint(Graphics g) {
        g.setColor(Color.red);
        g.fillRect(0, 0, 100, 150);
        g.setColor(Color.green);
        g.fillRect(100, 0, 100, 150);
        g.setColor(Color.blue);
        g.fillRect(200, 0, 100, 150);
        g.setColor(Color.black);
        g.drawString("ScreenSize="+
           Integer.toString(bounds.width)+
           "X"+ Integer.toString(bounds.height), 10, 15);
        g.drawString(gc.toString(), 10, 30);
    }
}
| Contents | Previous | Next |
Programmer's Guide to the JavaTM 2D API JavaTM 2 SDK, Standard Edition, 1.4 version |
Copyright © 2003 Sun Microsystems, Inc. All rights reserved.